Ui File for Menu and Action Entries
Simplifying Menu Creation with UI Files
Constructing menus purely in C can be a tedious process that results in lengthy, hard-to-read code. Fortunately, there is a better way. Just as we used UI files to simplify the creation of widgets, we can use XML-based UI files to define our menus. This approach improves code readability and saves development time.
Rewriting menu2 with a UI File
Let’s take the menu2 program from the previous
section and rewrite its menu construction using a UI file. To do
this, we need to understand a few basic XML tags used for GTK
menus.
Basic Tags for Menu
<menu>: The root element of a menu. It corresponds to a GMenu object. Theidattribute defines an identifier for this object. GtkBuilder uses this identifier to retrieve the menu in your C code.<item>: Corresponds to an item in a GMenu. In the C code in the previous section, this item was created using a GMenuItem.<attribute>: Defines the properties of an item or a menu. We use the name attribute to specify what property we are setting. The most common ones are:label: The text displayed to the user.action: The action triggered when the item is clicked (e.g.,app.quit).target: The parameter passed to a stateful action (e.g., “red”, “green”, “blue”).
<submenu>: A convenient shortcut tag to create a hierarchical menu (a menu within a menu).<section>: A shortcut tag to logically group menu items. GTK usually inserts a visual separator between sections to make the menu easier to read.
Rewriting menu2 with a UI File
Here is the UI file menu2.ui that mirrors the
menu structure we built purely in C in the previous section.
<?xml version="1.0" encoding="UTF-8"?>
<interface>
  <menu id="menubar">
    <submenu>
      <attribute name="label">Menu</attribute>
      <section>
        <item>
          <attribute name="label">Toggle Switch</attribute>
          <attribute name="action">win.toggle-switch</attribute>
        </item>
      </section>
      <section>
        <attribute name="label">Color</attribute>
        <item>
          <attribute name="label">Red</attribute>
          <attribute name="action">app.color</attribute>
          <attribute name="target">red</attribute>
        </item>
        <item>
          <attribute name="label">Green</attribute>
          <attribute name="action">app.color</attribute>
          <attribute name="target">green</attribute>
        </item>
        <item>
          <attribute name="label">Blue</attribute>
          <attribute name="action">app.color</attribute>
          <attribute name="target">blue</attribute>
        </item>
      </section>
      <section>
        <item>
          <attribute name="label">Quit</attribute>
          <attribute name="action">app.quit</attribute>
        </item>
      </section>
    </submenu>
  </menu>
</interface>
As you can see, the hierarchical structure is much easier to grasp at a glance compared to reading C code.
- 1: This line declares the XML version and encoding.
- 2: The
<interface>tag is the root element of all GTK UI files. - 3: The top-level
<menu>tag must have an id attribute. Here, the ID is “menubar”, which allows GtkBuilder to retrieve it in the C code. - 4-5: The
<submenu>tag creates a hierarchical menu. The<attribute>tag inside it sets the label of this submenu to “Menu”. This submenu contains the sections defined in lines 6 to 35. - 6-11: The first
<section>contains a single menu<item>. Its label is “Toggle Switch” and its action name is “win.toggle-switch”. - 12-29: The next section has a label attribute set to “Color” (which acts as a section heading) and contains three menu items for changing the color.
- 14-18: The first item’s label is “Red”, its action is
“app.color”, and its target is “red”. This corresponds to
“app.color::red” in the previous
menu2.ccode. - The remaining code follows the same pattern.
For further information, see GTK 4 API reference – PopoverMenu.
Now, let’s look at how to load this UI file in the C program.
The following snippet shows the relevant part of
menu2_ui.c inside the app_startup
function:
GtkBuilder *builder;
GMenuModel *menubar;

builder = gtk_builder_new_from_file ("menu2.ui");
menubar = G_MENU_MODEL (gtk_builder_get_object (builder, "menubar"));
gtk_application_set_menubar (GTK_APPLICATION (app), menubar);
g_object_unref (builder);
First, gtk_builder_new_from_file reads the
menu2.ui file and constructs the menu objects in
memory. Then, gtk_builder_get_object retrieves the
root menu using the ID “menubar”. After setting the menu to the
application with gtk_application_set_menubar, we no
longer need the builder, so we safely release it with
g_object_unref.
Note: gtk_builder_get_object simply returns a
pointer to the object without incrementing its reference count.
The builder retains full ownership, so you must not unref
menubar. In addition,
gtk_application_set_menubar adds its own reference
to the menubar, making it safe to unref the builder
immediately afterward.
A Quick Note on Menu Shortcuts
As mentioned earlier, <submenu> and
<section> are actually convenient shortcut
tags provided by GtkBuilder. Under the hood, a menu is strictly
a tree of <item> nodes connected by
<link> tags.
When you use a <section> or
<submenu>, GTK internally translates it into
an <item> that contains a
<link> with the name “section” or “submenu”.
To illustrate this, look at the two examples below. Both
snippets produce the exact same menu UI:
Example 1: Using the
<section> shortcut (Recommended)
<section>
  <item>
    <attribute name="label">Copy</attribute>
  </item>
  <item>
    <attribute name="label">Paste</attribute>
  </item>
</section>
Example 2: The actual internal structure
using <link>
<item>
  <link name="section">
    <item>
      <attribute name="label">Copy</attribute>
    </item>
    <item>
      <attribute name="label">Paste</attribute>
    </item>
  </link>
</item>
Both approaches are perfectly valid, but developers almost
always use the shortcuts (<section> and
<submenu>) because they are much easier to
read and write.
Building a Practical Menu
Now let’s look at a more practical example. Most desktop applications feature a standard menu bar with categories like “File”, “Edit”, and “View”.
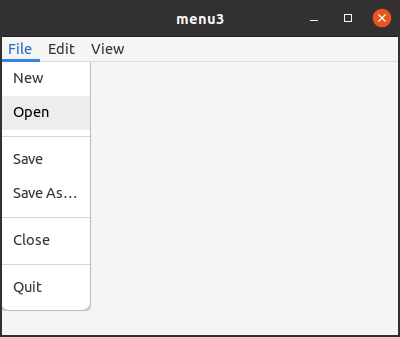
The menu3.ui file implements this familiar
structure.
<?xml version="1.0" encoding="UTF-8"?>
<interface>
  <menu id="menubar">
    <submenu>
      <attribute name="label">File</attribute>
      <section>
        <item>
          <attribute name="label">New</attribute>
          <attribute name="action">app.new</attribute>
        </item>
        <item>
          <attribute name="label">Open</attribute>
          <attribute name="action">app.open</attribute>
        </item>
      </section>
      <section>
        <item>
          <attribute name="label">Save</attribute>
          <attribute name="action">win.save</attribute>
        </item>
        <item>
          <attribute name="label">Save As…</attribute>
          <attribute name="action">win.saveas</attribute>
        </item>
      </section>
      <section>
        <item>
          <attribute name="label">Close</attribute>
          <attribute name="action">win.close</attribute>
        </item>
      </section>
      <section>
        <item>
          <attribute name="label">Quit</attribute>
          <attribute name="action">app.quit</attribute>
        </item>
      </section>
    </submenu>
    <submenu>
      <attribute name="label">Edit</attribute>
      <section>
        <item>
          <attribute name="label">Cut</attribute>
          <attribute name="action">win.cut</attribute>
        </item>
        <item>
          <attribute name="label">Copy</attribute>
          <attribute name="action">win.copy</attribute>
        </item>
        <item>
          <attribute name="label">Paste</attribute>
          <attribute name="action">win.paste</attribute>
        </item>
      </section>
      <section>
        <item>
          <attribute name="label">Select All</attribute>
          <attribute name="action">win.selectall</attribute>
        </item>
      </section>
    </submenu>
    <submenu>
      <attribute name="label">View</attribute>
      <section>
        <item>
          <attribute name="label">Fullscreen</attribute>
          <attribute name="action">win.fullscreen</attribute>
        </item>
      </section>
    </submenu>
  </menu>
</interface>
Although this UI file creates a much larger and deeper tree
structure compared to our previous example, notice that it uses
the exact same basic XML tags: <menu>,
<submenu>, <section>,
<item>, and <attribute>.
By simply nesting these familiar elements, you can build complex
and practical menu systems without learning any new syntax.
For more detailed information and advanced usage of menu UI files, please refer to the GtkPopoverMenu section in the GTK documentation.
Note: To load this UI file in your C code, you use
gtk_builder_new_from_file ("menu3.ui") exactly as
we did in the previous example. Since the C code for extracting
the menu from the builder is identical to menu2, we
will skip repeating it here.
Automating Action Creation with GActionEntry
In the previous examples, we created actions, connected their
signals, and added them to an action map one by one. While this
works, it requires a lot of repetitive boilerplate code. To
automate and simplify this process, GTK provides the
GActionEntry structure and the
g_action_map_add_action_entries function.
GActionEntry allows you to define all the properties of an
action — its name, signal handlers, parameter type, and initial
state—in a single array element.
typedef struct _GActionEntry GActionEntry;

struct _GActionEntry
{
  /* action name */
  const char *name;
  /* activate handler */
  void (* activate) (GSimpleAction *action, GVariant *parameter, gpointer user_data);
  /* the type of the parameter given as a single GVariant type string */
  const char *parameter_type;
  /* initial state given in GVariant text format */
  const char *state;
  /* change-state handler */
  void (* change_state) (GSimpleAction *action, GVariant *value, gpointer user_data);
  /*< private >*/
  gsize padding[3];
};
Let’s look at how the actions in menu3.c are
defined using this structure.
Non-stateful Actions
Most standard commands like “new”, “open”, or “quit” are non-stateful and do not require parameters.
{ "quit", quit_activated, NULL, NULL, NULL }- “quit”: The name of the action.
quit_activated: The “activate” signal handler.NULL: The parameter type. Since this action takes no parameters, it is NULL.NULL: The initial state. Since this is a non-stateful action, it is NULL.NULL: The “change-state” handler. Only stateful actions need this.
Stateful Actions without parameters
Actions that toggle a state (like switching fullscreen mode on and off) are defined slightly differently.
{ "fullscreen", NULL, NULL, "false", fullscreen_state_changed }- “fullscreen”: The name of the action.
NULL: The “activate” handler. For stateful actions, we usually handle state changes instead of basic activations, so this is NULL.NULL: The parameter type. This action doesn’t have parameters.- “false”: The initial state. It is provided in GVariant text format. As a boolean, the initial state is set to “false”.
fullscreen_state_changed: The “change-state” handler. This handler is called in response to a request to toggle the action’s state.
Stateful Actions with Parameters
Although menu3.c does not use them, some actions
require parameters (for example, an action that changes a color
based on the user’s selection). If you were to recreate the
“color” action from our earlier examples, the entry would look
like this:
{ "color", NULL, "s", "'red'", color_state_changed }- “color”: The name of the action.
NULL: The “activate” handler. For stateful actions, we usually handle state changes instead of basic activations, so this is NULL.- “s”: The parameter type. This uses a GVariant format string, where “s” stands for a standard string. See GVariant format strings for details.
- “‘red’”: The initial state. This must be written in GVariant
text format. Because GVariant expects string values to be
explicitly quoted, you must include quotes inside your C string.
You can write this using single quotes like
"'red'"or by escaping double quotes like"\"red\"". See GVariant text format for details. color_state_changed: The “change-state” handler. This handler is called in response to a request to toggle the action’s state.
Registering the Entries
Once you define an array of GActionEntry, you can register
all of them at once using
g_action_map_add_action_entries().
For the window-scoped actions, we do this inside
app_activate:
const GActionEntry win_entries[] = {
  { "save", save_activated, NULL, NULL, NULL },
  { "saveas", saveas_activated, NULL, NULL, NULL },
  { "close", close_activated, NULL, NULL, NULL },
  { "cut", cut_activated, NULL, NULL, NULL },
  { "copy", copy_activated, NULL, NULL, NULL },
  { "paste", paste_activated, NULL, NULL, NULL },
  { "selectall", selectall_activated, NULL, NULL, NULL },
  { "fullscreen", NULL, NULL, "false", fullscreen_state_changed }
};
g_action_map_add_action_entries (G_ACTION_MAP (win), win_entries, G_N_ELEMENTS (win_entries), win);
This single function call performs all the heavy lifting:
- It iterates through the win_entries array.
- It creates the GSimpleAction instances.
- It sets up their initial states.
- It connects the “activate” and “change-state” signal handlers.
- It adds all the newly created actions to the
winaction map.
We do the exact same thing for the application-scoped actions
inside app_startup:
const GActionEntry app_entries[] = {
  { "new", new_activated, NULL, NULL, NULL },
  { "open", open_activated, NULL, NULL, NULL },
  { "quit", quit_activated, NULL, NULL, NULL }
};
g_action_map_add_action_entries (G_ACTION_MAP (app), app_entries, G_N_ELEMENTS (app_entries), app);
Important Note on Signal Handler Signatures
Strictly speaking, your handler functions must exactly match the standard GObject callback signature, accepting a gpointer for the user data:
static void
handler (GSimpleAction *action, GVariant *parameter, gpointer user_data) {
  // ...
}
Even if you know that user_data will be a
GApplication, you cannot change the function signature to
(..., GApplication *app). The
g_action_map_add_action_entries function expects
standard GObject callback signatures. Instead, you should accept
gpointer user_data and cast it inside the function
body, like this:
static void
quit_activated (GSimpleAction *action, GVariant *parameter, gpointer user_data) {
  GApplication *app = G_APPLICATION (user_data);
  g_application_quit (app);
}
Full Source Code
The complete source files, including menu3.c and
menu3.ui, are located in the src/menu
directory. It is helpful to review the full code to see how the
UI definitions and the GActionEntry implementations come
together.