GtkPopoverMenuBar and GtkMenuButton
GtkPopoverMenuBar
As explained in the previous sections,
GMenuModel is strictly a model, not a widget. This
means it cannot be displayed on the screen by itself. In earlier
examples, the widget assembly was handled automatically in the
background by
gtk_application_window_set_show_menubar.
However, you can explicitly build and place this menu within
your program using GtkPopoverMenuBar. The
menu4.c source file demonstrates how to display a
menu bar equivalent to menu3.c using this manual
approach.
Because this method is more complex than using
gtk_application_window_set_show_menubar, it is
generally not recommended unless you specifically need to
customize the placement of the menu bar (e.g., placing it
somewhere other than the top of the window). For this reason, we
will skip a detailed explanation of
GtkPopoverMenuBar here, but interested readers are
encouraged to examine the menu4.c
code.
GtkMenuButton
This section introduces the modern approach to displaying menus: using a menu button that reveals a popup menu when clicked. This is the recommended design pattern in modern GTK applications.
We will demonstrate this by adding a menu button to our Text File Editor (TFE) program.
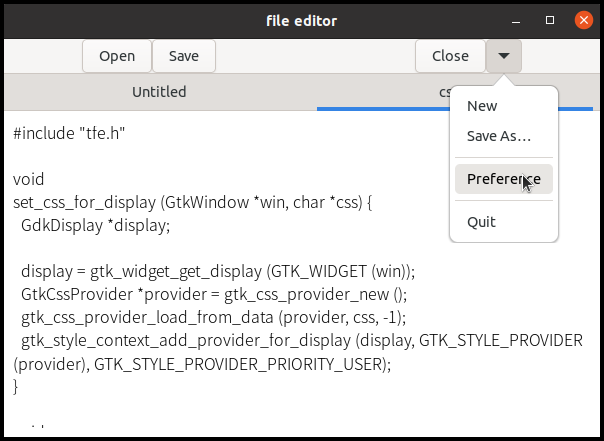
As shown in the image, the toolbar contains four buttons:
- Open
- Save
- Close
- Menu (with a downward-pointing triangle icon)
The rightmost button is the menu button. Clicking it reveals a dropdown menu with the following items:
- New
- Save as
- Preference
- Quit
In modern UI design, frequently used functions are placed as standard buttons, while less common features are tucked away in menus. This is because accessing a menu requires a two-step operation: (1) clicking the menu button, and (2) clicking the menu item. Traditional menu bars also require two steps (e.g., clicking “Edit”, then “Copy”).
In contrast, standard buttons require only a single click. Eliminating just one step might seem trivial, but it makes quite a big difference in user experience. Modern applications favor this approach to keep the interface clean and efficient.
Implementing the Menu in TFE
UI Files
It is good practice to separate the UI file for the menu from the UI file for the main widgets. Because our popup menu is quite simple and introduces no new concepts, we will skip the explanation of its XML structure. Please refer to src/tfe6/gtk/menus.ui for the code.
Automatic Resources
In previous examples, you might have used GtkBuilder to manually load UI files and extract the objects. However, GtkApplication provides a very convenient feature called “Automatic Resources” for your menu UI resources.
If you place your menu definition file at exactly
gtk/menus.ui relative to your application’s
resource base path, GtkApplication will automatically load it
for you in the background and you don’t need to write any
GtkBuilder code. The application’s resource base path is
normally created from the application ID. For example, if the
application ID is “com.github.ToshioCP.tfe6”, the application’s
resource base path is “/com/github/ToshioCP/tfe6”. Therefore,
the menu definition UI resource path is
“/com/github/ToshioCP/tfe6/gtk/menus.ui”.
<?xml version="1.0" encoding="UTF-8"?>
<gresources>
  <gresource prefix="/com/github/ToshioCP/tfe6">
    <file>tfe.ui</file>
    <file alias="gtk/menus.ui">menus.ui</file>
  </gresource>
</gresources>
The file path in the project source is menus.ui
but the resource path is gtk/menus.ui. We use an
alias to resolve this in the tfe.gresource.xml
file.
<file alias="gtk/menus.ui">menus.ui</file>Inside this menus.ui, you can define multiple
menus and assign them unique IDs. When you need a specific menu
in your C code, you simply call
gtk_application_get_menu_by_id() with the desired
ID.
In the following code, the menu model is retrieved using
gtk_application_get_menu_by_id(). The argument
“menu” is the ID of the menu tag in the UI resource.
<?xml version="1.0" encoding="UTF-8"?>
<interface>
  <menu id="menu">
  ... ... ...
You don’t need to write any GtkBuilder boilerplate code.
GMenuModel *menu = G_MENU_MODEL (gtk_application_get_menu_by_id (app, "menu"));The Menu Button
Connecting a menu to a menu button is easy and
straightforward. Once you have built your menu model, you simply
attach it using the gtk_menu_button_set_menu_model
function:
gtk_menu_button_set_menu_model (GtkMenuButton *menu_button, G_MENU_MODEL *menu_model);In the widget UI file, we configure the property of the menu button:
<object class="GtkMenuButton" id="btnm">
  <property name="direction">none</property>
</object>
The direction property dictates which way the menu pops up
relative to the button. Its default value is
GTK_ARROW_DOWN (“down” in UI file), which
automatically displays a downward-pointing triangle icon, as
seen in the image at the beginning of this section. This
triangle adapts depending on the chosen direction (up, down,
left, or right).
By setting the direction property to “none”
(GTK_ARROW_NONE), the menu still pops up downward,
but the button’s icon changes to “open-menu-symbolic”, the
standard “hamburger” menu icon. You can also explicitly change
the icon by setting the “icon-name” property. Some common
alternatives include:
- view-more-symbolic: The “three dots” (kebab) menu icon.
- emblem-system-symbolic: The gear icon, typically used for settings.
For example, to create a “three-dot” menu button, your XML would look like this:
<object class="GtkMenuButton" id="btnm">
  <property name="direction">none</property>
  <property name="icon-name">view-more-symbolic</property>
</object>
To explore the available icons, you can use the
gtk4-icon-browser tool. Run the following command
in your terminal:
$ gtk4-icon-browserOnce the window opens, click the “Symbolic” tab at the top to find icons suited for UI elements.
GtkActionable
Unlike in previous examples, the buttons in this widget UI file are directly bound to actions. These buttons implement the GtkActionable interface, which provides the functionality to link a widget to a specific action.
We have three standard buttons: “Open”, “Save”, and “Close”. There are two ways to handle a button click event.
- Connect the “clicked” signal directly to your handler. This is a simpler way.
- Register an action to the button, making it behave similarly to a menu item. When the button is clicked, its corresponding action is activated. This approach is slightly more complex because it requires creating the action and its activate handler in advance. However, it offers a big advantage: you can connect multiple triggers to a single action.
For instance, you can link a keyboard accelerator to the action. Accelerators are keystrokes (like Ctrl+O) mapped to specific actions. By using this method, clicking the “Open” button or pressing Ctrl+O will activate the same file-opening action. This is the primary reason why actions are designed to be independent of specific buttons or menus.
For example, the UI definition for the “Open” button looks like this:
<object class="GtkButton">
  <property name="label">Open</property>
  <property name="action-name">win.open</property>
</object>
By setting the “action-name” property to “win.open”, the “open” action is activated whenever the button is clicked. You simply need to write the file-opening logic inside the action’s activate signal handler. The workflow is identical to using actions within a menu.
A Note for WSL Users
When running GTK applications on WSL (Windows Subsystem for Linux), you may notice that the menu button fails to display the menu on the second and subsequent clicks. Because this bug does not occur in native Linux environments, it is likely an issue specific to WSL’s rendering system. Currently, developing and testing GTK applications that rely heavily on popup menus can be problematic under WSL.
Source files
The source files are under the src/tfe6
directory. You can build and run the program by changing your
current directory to src/tfe6 and typing:
$ meson setup _build
$ ninja -C _build
$ _build/tfe