Drag and Drop
What is Drag and Drop?
Drag and drop (often hyphenated as “drag-and-drop”, or shortened to “DnD”) works much like copying and pasting. When a user drags a UI element — such as a widget or a selected piece of content — and drops it onto another area, underlying data is transferred from the source to the target.
You are probably already familiar with this action from everyday tasks like dragging files between folders.
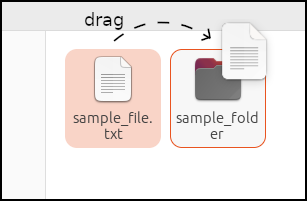
When a drag operation begins, the file
sample_file.txt is handed over to the system. When
the operation ends with a drop, the system transfers the file to
sample_folder in the file manager. In this
scenario, it acts much like a “cut and paste” action. While the
actual technical implementation differs, the underlying concept
is similar.
DND Example
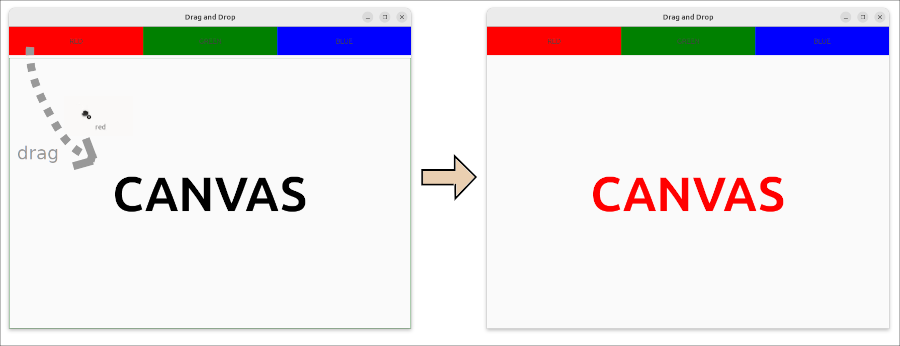
This tutorial provides a simple example in the
src/dnd directory. The UI consists of three colored
source labels (“red”, “green”, and “blue”) at the top and a
large target label below them. When you drag one of the colored
labels and drop it onto the target, the target’s text color
changes accordingly.
UI File
The application’s widgets are defined in a
dnd.ui XML file.
<?xml version="1.0" encoding="UTF-8"?>
<interface>
  <object class="GtkApplicationWindow" id="win">
    <property name="default-width">800</property>
    <property name="default-height">600</property>
    <property name="resizable">FALSE</property>
    <property name="title">Drag and Drop</property>
    <child>
      <object class="GtkBox">
        <property name="hexpand">TRUE</property>
        <property name="vexpand">TRUE</property>
        <property name="orientation">GTK_ORIENTATION_VERTICAL</property>
        <property name="spacing">5</property>
        <child>
          <object class="GtkBox">
            <property name="orientation">GTK_ORIENTATION_HORIZONTAL</property>
            <property name="homogeneous">TRUE</property>
            <child>
              <object class="GtkLabel" id="red">
                <property name="label">RED</property>
                <property name="justify">GTK_JUSTIFY_CENTER</property>
                <property name="name">red</property>
              </object>
            </child>
            <child>
              <object class="GtkLabel" id="green">
                <property name="label">GREEN</property>
                <property name="justify">GTK_JUSTIFY_CENTER</property>
                <property name="name">green</property>
              </object>
            </child>
            <child>
              <object class="GtkLabel" id="blue">
                <property name="label">BLUE</property>
                <property name="justify">GTK_JUSTIFY_CENTER</property>
                <property name="name">blue</property>
              </object>
            </child>
          </object>
        </child>
        <child>
          <object class="GtkLabel" id="canvas">
            <property name="label">CANVAS</property>
            <property name="justify">GTK_JUSTIFY_CENTER</property>
            <property name="name">canvas</property>
            <property name="hexpand">TRUE</property>
            <property name="vexpand">TRUE</property>
          </object>
        </child>
      </object>
    </child>
  </object>
</interface>
This UI file is compiled into a resource file using the
glib-compile-resources utility. To do this, the
compiler requires a resource description file,
dnd.gresource.xml.
<?xml version="1.0" encoding="UTF-8"?>
<gresources>
  <gresource prefix="/com/github/ToshioCP/dnd">
    <file>dnd.ui</file>
  </gresource>
</gresources>
The dnd.c Source
File
The dnd.c source file is relatively short,
containing fewer than a hundred lines of code. Inside this file,
the main function creates a GtkApplication
object.
int
main (int argc, char **argv) {
  GtkApplication *app;
  int stat;

  app = gtk_application_new (APPLICATION_ID, G_APPLICATION_DEFAULT_FLAGS);
  g_signal_connect (app, "startup", G_CALLBACK (app_startup), NULL);
  g_signal_connect (app, "activate", G_CALLBACK (app_activate), NULL);
  stat = g_application_run (G_APPLICATION (app), argc, argv);
  g_object_unref (app);
  return stat;
}
The application ID is defined as:
#define APPLICATION_ID "com.github.ToshioCP.dnd"Startup Signal Handler
Most of the work in this application is done inside the
startup signal handler.
To implement drag-and-drop, we use two main objects:
GtkDragSource and GtkDropTarget.
- Drag source: GtkDragSource is an event controller. It initiates a DnD operation when the user clicks and drags a widget. If you prepare data in advance using a GdkContentProvider, the drag source hands this data over to the system as soon as the drag begins.
- Drop target: GtkDropTarget is also an event controller. When
the dragged data is dropped onto the target widget, you can
retrieve that data inside its drop signal handler
(
GtkDrpTarget::drop).
The example below demonstrates a very simple way to use these objects.
For more information, refer to the official documentation:
static void
app_startup (GApplication *application) {
  GtkApplication *app = GTK_APPLICATION (application);
  GtkBuilder *build;
  GtkWindow *win;
  GtkLabel *src_labels[3];
  int i;
  GtkLabel *canvas;
  GtkDragSource *src;
  GdkContentProvider *content;
  GtkDropTarget *tgt;
  GdkDisplay *display;
  char *s;

  build = gtk_builder_new_from_resource ("/com/github/ToshioCP/dnd/dnd.ui");
  win = GTK_WINDOW (gtk_builder_get_object (build, "win"));
  src_labels[0] = GTK_LABEL (gtk_builder_get_object (build, "red"));
  src_labels[1] = GTK_LABEL (gtk_builder_get_object (build, "green"));
  src_labels[2] = GTK_LABEL (gtk_builder_get_object (build, "blue"));
  canvas = GTK_LABEL (gtk_builder_get_object (build, "canvas"));
  gtk_window_set_application (win, app);
  g_object_unref (build);

  for (i=0; i<3; ++i) {
    src = gtk_drag_source_new ();
    content = gdk_content_provider_new_typed (G_TYPE_STRING, gtk_widget_get_name (GTK_WIDGET (src_labels[i])));
    gtk_drag_source_set_content (src, content);
    g_object_unref (content);
    gtk_widget_add_controller (GTK_WIDGET (src_labels[i]), GTK_EVENT_CONTROLLER (src)); // The ownership of src is taken by the instance.
  }

  tgt = gtk_drop_target_new (G_TYPE_STRING, GDK_ACTION_COPY);
  g_signal_connect (tgt, "drop", G_CALLBACK (drop_cb), NULL);
  gtk_widget_add_controller (GTK_WIDGET (canvas), GTK_EVENT_CONTROLLER (tgt)); // The ownership of tgt is taken by the instance.

  provider = gtk_css_provider_new ();
  s = g_strdup_printf (format, "black");
  gtk_css_provider_load_from_string (provider, s);
  g_free (s);
  display = gdk_display_get_default ();
  gtk_style_context_add_provider_for_display (display, GTK_STYLE_PROVIDER (provider),
                                              GTK_STYLE_PROVIDER_PRIORITY_APPLICATION);
  g_object_unref (provider); // The provider is still alive because the display owns it.
}- 15–22: Builds the widgets from the UI file. The
src_labels[]array holds references to the red, green, and blue source labels, while thecanvasvariable points to the destination label. - 24–30: Configures the drag source widgets. The
forloop iterates through each of the three colored source labels. - 25: Creates a new GtkDragSource instance.
- 26: Creates a GdkContentProvider containing the widget’s name (“red”, “green”, or “blue”). This string is the payload transferred during the drag operation.
- 27: Assigns the content provider to the drag source.
- 28: Releases the local reference to the content provider
using
g_object_unref(). The drag source now holds its own reference, so the local one is no longer needed. - 29: Adds the drag source (which is an event controller) to the widget. When a user drags this widget, the drag source activates and provides the data to the system.
- 32–34: Configures the drop target.
- 32: Creates a new GtkDropTarget. The parameters specify that
it accepts string data (
G_TYPE_STRING) and allows copy operations (GDK_ACTION_COPY).GDK_ACTION_COPYis a GdkDragAction enumeration constant. - 33: Connects the drop signal to the
drop_cbcallback function. - 34: Adds the drop target event controller to the
canvaswidget. - 36–43: Applies CSS styling to the application.
- 37: Formats the CSS string using a static variable named
format, which is defined at the top of the program (shown below).
static GtkCssProvider *provider = NULL;
static const char *format = "label {padding: 20px;} label#red {background: red;} "
  "label#green {background: green;} label#blue {background: blue;} "
  "label#canvas {color: %s; font-weight: bold; font-size: 72pt;}";
Activate Signal Handler
static void
app_activate (GApplication *application) {
  GtkApplication *app = GTK_APPLICATION (application);
  GtkWindow *win;

  win = gtk_application_get_active_window (app);
  gtk_window_present (win);
}
This handler just shows the window.
Drop Signal Handler
static gboolean
drop_cb (GtkDropTarget *self, const GValue *value, gdouble x, gdouble y, gpointer user_data) {
  char *s;

  s = g_strdup_printf (format, g_value_get_string (value));
  gtk_css_provider_load_from_string (provider, s);
  g_free (s);
  return TRUE;
}
The “drop” signal handler takes five parameters:
self: The GtkDropTarget instance that emitted the signal.value: A GValue containing the data transferred from the drag source.xandy: The coordinates of the mouse pointer when the drop occurred.user_data: The user data pointer provided when the signal was connected. Indnd.ctheuser_datapointer was set toNULL.
The value parameter holds the payload string
(“red”, “green”, or “blue”). This string replaces the
%s placeholder in the format variable to generate a
new CSS string. As a result, the text color of the
canvas label is updated to match the dropped
color.
Building with Meson
The meson.build file controls the build
process.
project('dnd', 'c')

gtkdep = dependency('gtk4')

gnome = import('gnome')
resources = gnome.compile_resources('resources','dnd.gresource.xml')

executable(meson.project_name(), 'dnd.c', resources, dependencies: gtkdep, export_dynamic: true, install: false)
You can build and run the dnd application from
the command line using the following commands:
$ cd src/dnd
$ meson setup _build
$ ninja -C _build
$ _build/dnd
The complete source files are located in the src/dnd
directory of the tutorial repository. Feel free to download it
and explore the code yourself.