GtkBuilder and UI Files
We developed a very simple editor in the previous section. While it functions by reading and writing files at the start and end of the program, there is room for improvement. It would be more user-friendly to have “New”, “Open”, “Save”, and “Close” buttons. This section describes how to incorporate these buttons into the window. We will focus on building the widgets and omit the file I/O functions for now.
New, Open, Save and Close Buttons
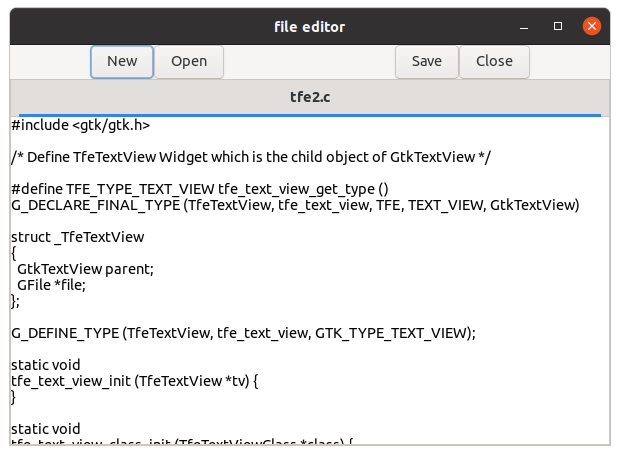
The screenshot above shows the layout. The source code
tfe2.c is as follows.
#include <gtk/gtk.h>

static void
app_activate (GApplication *app) {
  GtkWidget *win, *nb, *scr, *tv, *label;
  GtkWidget *boxv, *boxh;
  GtkWidget *dmy1, *dmy2, *dmy3;
  GtkWidget *btnn; /* button for new */
  GtkWidget *btno; /* button for open */
  GtkWidget *btns; /* button for save */
  GtkWidget *btnc; /* button for close */
  int i;
  GtkNotebookPage *nbp;
  char *files[] = {"file-1", "file-2"};

  win = gtk_application_window_new (GTK_APPLICATION (app));
  gtk_window_set_title (GTK_WINDOW (win), "file editor");
  gtk_window_set_default_size (GTK_WINDOW (win), 600, 400);

  boxv = gtk_box_new (GTK_ORIENTATION_VERTICAL, 0);
  gtk_window_set_child (GTK_WINDOW (win), boxv);

  boxh = gtk_box_new (GTK_ORIENTATION_HORIZONTAL, 0);
  gtk_box_append (GTK_BOX (boxv), boxh);

  dmy1 = gtk_label_new(NULL); /* dummy label for left space */
  gtk_label_set_width_chars (GTK_LABEL (dmy1), 10);
  dmy2 = gtk_label_new(NULL); /* dummy label for center space */
  gtk_widget_set_hexpand (dmy2, TRUE);
  dmy3 = gtk_label_new(NULL); /* dummy label for right space */
  gtk_label_set_width_chars (GTK_LABEL (dmy3), 10);
  btnn = gtk_button_new_with_label ("New");
  btno = gtk_button_new_with_label ("Open");
  btns = gtk_button_new_with_label ("Save");
  btnc = gtk_button_new_with_label ("Close");

  gtk_box_append (GTK_BOX (boxh), dmy1);
  gtk_box_append (GTK_BOX (boxh), btnn);
  gtk_box_append (GTK_BOX (boxh), btno);
  gtk_box_append (GTK_BOX (boxh), dmy2);
  gtk_box_append (GTK_BOX (boxh), btns);
  gtk_box_append (GTK_BOX (boxh), btnc);
  gtk_box_append (GTK_BOX (boxh), dmy3);

  nb = gtk_notebook_new ();
  gtk_widget_set_hexpand (nb, TRUE);
  gtk_widget_set_vexpand (nb, TRUE);
  gtk_box_append (GTK_BOX (boxv), nb);

  for (i = 0; i < 2; i++) {
    scr = gtk_scrolled_window_new ();
    tv = gtk_text_view_new ();
    label = gtk_label_new (files[i]);
    gtk_text_view_set_wrap_mode (GTK_TEXT_VIEW (tv), GTK_WRAP_WORD_CHAR);
    gtk_scrolled_window_set_child (GTK_SCROLLED_WINDOW (scr), tv);
    gtk_notebook_append_page (GTK_NOTEBOOK (nb), scr, label);
    nbp = gtk_notebook_get_page (GTK_NOTEBOOK (nb), scr);
    g_object_set (nbp, "tab-expand", TRUE, NULL);
  }
  gtk_window_present (GTK_WINDOW (win));
}

int
main (int argc, char **argv) {
  GtkApplication *app;
  int stat;

  app = gtk_application_new ("com.github.ToshioCP.tfe2", G_APPLICATION_DEFAULT_FLAGS);
  g_signal_connect (app, "activate", G_CALLBACK (app_activate), NULL);
  stat = g_application_run (G_APPLICATION (app), argc, argv);
  g_object_unref (app);
  return stat;
}
This program just builds the widgets. Other features will be implemented in the later sactions.
The function app_activate builds the widgets in
the main application window.
- 16-18: Creates a GtkApplicationWindow instance and sets the title and default size.
- 20-21: Creates a vertical GtkBox instance
boxvas a child of GtkApplicationWindow. - 23-24: Creates a horizontal GtkBox instance
boxhand appends it toboxvas the first child. - 26-31: Creates three dummy labels. The
dmy1anddmy3labels are ten characters wide, while thedmy2label has itshexpandproperty set toTRUEto fill the available space. - 32-35: Creates four buttons
New,Open,Save, andClose. - 37-43: Appends these label and button instances to
boxh. - 45-48: Creates a GtkNotebook instance with
hexpandandvexpandproperties set toTRUE, allowing it to expand in both directions. It is then appended toboxvas the second child. - 50-59: Creates, GtkScrolledWindow, GtkTextView, and GtkLabel
instances in the for-loop. The scrolled window
scrtakestvas a child. The functiongtk_notebook_append_pageappendsscras a page andlabelas a page tab to the note book. The functiongtk_notebook_get_pageretrieves the GtkNotebookPage instance that corresponds toscr, a child widget ofnb. GtkNotebookPage class does not have a function to set the property “tab-expand”, so the general property setting functiong_object_setis used here. The property is set to TRUE to expand the tab horizontally.
Building widgets takes 44 lines (= 59-16+1). We also needed
many variables (boxv, boxh,
dmy1, …), and most of them are used only for
building the widgets. Is there a better way to reduce this
overhead?
Gtk provides GtkBuilder. It reads user interface (UI) data and builds a window. It simplifies this tedious process.
UI Files
Look at the UI file tfe3.ui that defines the
widget structure.
<?xml version="1.0" encoding="UTF-8"?>
<interface>
  <object class="GtkApplicationWindow" id="win">
    <property name="title">file editor</property>
    <property name="default-width">600</property>
    <property name="default-height">400</property>
    <child>
      <object class="GtkBox">
        <property name="orientation">GTK_ORIENTATION_VERTICAL</property>
        <child>
          <object class="GtkBox">
            <property name="orientation">GTK_ORIENTATION_HORIZONTAL</property>
            <child>
              <object class="GtkLabel">
                <property name="width-chars">10</property>
              </object>
            </child>
            <child>
              <object class="GtkButton">
                <property name="label">New</property>
              </object>
            </child>
            <child>
              <object class="GtkButton">
                <property name="label">Open</property>
              </object>
            </child>
            <child>
              <object class="GtkLabel">
                <property name="hexpand">TRUE</property>
              </object>
            </child>
            <child>
              <object class="GtkButton">
                <property name="label">Save</property>
              </object>
            </child>
            <child>
              <object class="GtkButton">
                <property name="label">Close</property>
              </object>
            </child>
            <child>
              <object class="GtkLabel">
                <property name="width-chars">10</property>
              </object>
            </child>
          </object>
        </child>
        <child>
          <object class="GtkNotebook" id="nb">
            <property name="hexpand">TRUE</property>
            <property name="vexpand">TRUE</property>
            <child>
              <object class="GtkScrolledWindow">
                <property name="hscrollbar-policy">automatic</property>
                <property name="vscrollbar-policy">automatic</property>
                <child>
                  <object class="GtkTextView">
                  </object>
                </child>
              </object>
            </child>
            <child type="tab">
              <object class="GtkLabel">
                <property name="label">file-1</property>
              </object>
            </child>
            <child>
              <object class="GtkScrolledWindow">
                <property name="hscrollbar-policy">automatic</property>
                <property name="vscrollbar-policy">automatic</property>
                <child>
                  <object class="GtkTextView">
                  </object>
                </child>
              </object>
            </child>
            <child type="tab">
              <object class="GtkLabel">
                <property name="label">file-2</property>
              </object>
            </child>
          </object>
        </child>
      </object>
    </child>
  </object>
</interface>
This is an XML file. The extension “ui” means User Interface.
Tags are enclosed in angle brackets, beginning with
< and ending with >. They
generally come in pairs: a start tag and an end tag. For
instance, <interface> opens the element,
while </interface> closes it.
The end tag is identified by a forward slash immediately following the opening bracket, and its name must match the corresponding start tag. Additionally, certain tags (such as object tags) can include class and id attributes within their start tag to provide extra metadata.
- 1: XML declaration. This is a special tag and doesn’t follow the “start and end tag” rule. It specifies that the XML version is 1.0 and the encoding is UTF-8.
- 2, 89: The UI file begins and ends with interface tags.
- 3: The object tag defines an instance with the class of
GtkApplicationWindowand the id ofwin. The class attribute specifies the type of the object to create, while the id attribute provides a unique name used to retrieve the object within your C code. - 4-6: Property tags define the values of the properties on
the object that is defined with an object tag just before the
property definitions. These three lines define the properties of
the top-level window
win.- title: “file editor”
- default-width: 600
- default-height: 400
- 7: Child tag means that the following object is a child
widget. For example, line 7 defines the GtkBox as a child widget
of the GtkApplicationWindow
win. - 8-49: Defines a horizontal box comprising labels and buttons.
- 50-85: Defines the GtkNotebook as a child of the vertical
box. It contains two pairs of children, where each pair consists
of a content area (a scrolled window) and a tab (a label). While
a standard
<child>tag defines the content, a<child>tag withtype="tab"defines the tab itself. Note that GtkNotebookPage cannot be defined directly in UI files because it is not a widget; it is an auxiliary object derived directly from GObject.
Compare this UI file with the app_activate
function of tfe2.c. While both methods produce the
same window and widget hierarchy, the UI file approach offers
superior readability and easier maintenance.
Gtk4-Builder-Tool
You can verify and optimize your UI files using the
gtk4-builder-tool utility.
- Validation:
gtk4-builder-tool validate <ui_file_name>checks the file for errors. If the UI file contains syntax errors or invalid object definitions, the tool will point them out. - Simplification:
gtk4-builder-tool simplify <ui_file_name>cleans up the UI file and prints the result to the terminal.- The
--replaceoption: Using this option replaces the original file with the simplified version. - Removing Defaults: If a property is set to its default
value, the tool removes it to save space. For example, since the
default orientation for GtkBox widgets is horizontal, that line
would be deleted (ex. line 12 in
tfe3.ui). - Value Conversion: Some values are shortened; for instance, “TRUE” and “FALSE” are converted to “1” and “0”.
- The
Example:
$ gtk-builder-tool validate tfe/tfe3.ui
$
Since tfe3.ui contains no errors,
gtk-builder-tool produced no output.
A Note on Maintenance
While the simplify tool makes the file smaller, it can sometimes make it harder to read. For example, it converts “TRUE” and “FALSe” into “1” and “0” respectively. Keeping “TRUE” or “FALSE” is better for maintenance because it is more readable for humans than “1” or “0”.
It is always a good practice to validate your UI file before deploying your application.
GtkBuilder
The file tfe3.c
builds the same widget as tfe2.c using
tfe3.ui. It is far shorter than tfe2.c
(39 lines against 73 lines).
$ wc tfe/tfe2.c tfe/tfe3.c
  73  274 2557 tfe/tfe2.c
  38  113 1093 tfe/tfe3.c
 111  387 3650 total
$
The following is the file tfe3.c
#include <gtk/gtk.h>

static void
app_activate (GApplication *app) {
  GtkWidget *win;
  GtkWidget *nb;
  GtkWidget *scr;
  GtkNotebookPage *nbp;
  int n_pages;
  GtkBuilder *build;

  build = gtk_builder_new_from_file ("tfe3.ui");
  win = GTK_WIDGET (gtk_builder_get_object (build, "win"));
  nb = GTK_WIDGET (gtk_builder_get_object (build, "nb"));
  gtk_window_set_application (GTK_WINDOW (win), GTK_APPLICATION (app));
  g_object_unref(build);

  n_pages = gtk_notebook_get_n_pages (GTK_NOTEBOOK (nb));
  for (int i = 0; i < n_pages; i++) {
    scr = gtk_notebook_get_nth_page (GTK_NOTEBOOK (nb), i);
    nbp = gtk_notebook_get_page (GTK_NOTEBOOK (nb), scr);
    g_object_set (nbp, "tab-expand", TRUE, NULL);
  }

  gtk_window_present (GTK_WINDOW (win));
}

int
main (int argc, char **argv) {
  GtkApplication *app;
  int stat;

  app = gtk_application_new ("com.github.ToshioCP.tfe3", G_APPLICATION_DEFAULT_FLAGS);
  g_signal_connect (app, "activate", G_CALLBACK (app_activate), NULL);
  stat = g_application_run (G_APPLICATION (app), argc, argv);
  g_object_unref (app);
  return stat;
}
GtkBuilder builds widgets based on a UI file.
- 12: The function
gtk_builder_new_from_filereads the filetfe3.ui. Then, it builds the widgets and creates a GtkBuilder object. All the widgets are connected based on the parent-children relationship described in the UI file. - 13, 14: We can retrieve objects from the builder object
using the
gtk_builder_get_objectfunction. The top level window, which has an id of “win” in the UI file, is taken and assigned to the variablewin. Similarly, The GtkNotbook instance with the id “nb” is assignd to the variablenb. - 15: The function
gtk_window_set_applicationaddswinto the application’s list of managed windows. You can usegtk_application_add_windowinstead of this function. The result is identical. - 16: After the window and the application are connected, we
no longer need the GtkBuilder instance. It is released with the
g_object_unreffunction. 18-23: Sets the “tab-expand” properties of the GtkNotebookPage instances to TRUE. Since GtkNotebookPage is not a widget, its properties cannot be set in the UI file; you must set them in your C source code.
Using UI String
GtkBuilder can build widgets with a string. Use
gtk_builder_new_from_string instead of
gtk_builder_new_from_file.
char *uistring;

uistring =
"<interface>"
  "<object class=\"GtkApplicationWindow\" id=\"win\">"
    "<property name=\"title\">file editor</property>"
    "<property name=\"default-width\">600</property>"
    "<property name=\"default-height\">400</property>"
    "<child>"
      "<object class=\"GtkBox\">"
        "<property name=\"orientation\">GTK_ORIENTATION_VERTICAL</property>"
... ... ...
... ... ...
"</interface>";

build = gtk_builder_new_from_string (uistring, -1);
This method has an advantage and disadvantage. The advantage is that the UI string is written in the source code. So, no UI file is needed at runtime. The disadvantage is that defining the UI as a C string can be tedious, as the xml needs quoting and special characters need escaping. If you want to use this method, you should write a script that converts UI files into C string literals.
- Replace backslashes with two backslashes.
- Add a backslash before each double quote.
- Add double quotes at the left and right of the string in each line.
Or, if you have jq installed, you can use
jq -R < tfe3.ui to do the quoting and escaping
for you.
GResources
A GResource is similar to a UI string, except that a
GResource is a binary data. The
glib-compile-resources program compiles UI files
into GResources. It can compile not only text files but also
binary files such as images, sounds and so on. After
compilation, it bundles them up into one GResource object.
An xml file is necessary for the resource compiler
glib-compile-resources. It describes resource
files.
<?xml version="1.0" encoding="UTF-8"?>
<gresources>
  <gresource prefix="/com/github/ToshioCP/tfe3">
    <file>tfe3.ui</file>
  </gresource>
</gresources>- 2:
<gresources>tag can include multiple<gresource>tags. However, this xml has only one<gresource>tag. - 3: A
<gresource>tag can have a prefix attribute. This tag defines that the prefix fortfe3.uiis/com/github/ToshioCP/tfe3. A prefix works like a namespace. As a best practice, you should always use your Application ID (with dots replaced by slashes) as the prefix. In this program, the Application ID is “com.github.ToshioCP.tfe3” and the prefix is “/com/github/ToshioCP/tfe3”. While it is technically possible to define multiple different prefixes within a single application to distinguish resources with the same name, this is not recommended. If you need to organize multiple resources, you should keep a single Application ID prefix and distinguish your files by giving them different filenames or placing them in different subdirectories. - 4: The name of the GRresource is
tfe3.ui. The resource will be referred to as “/com/github/ToshioCP/tfe3/tfe3.ui” by GtkBuilder. The pattern is “prefix” + “name”. If you want to add more files, insert them between line 4 and 5.
Save this xml text to tfe3.gresource.xml. The
GResource compiler glib-compile-resources shows its
usage with the argument --help.
$ glib-compile-resources --help
用法:
  glib-compile-resources [オプション…] ファイル

リソース仕様をコンパイルして、リソースファイルを生成します。
リソース仕様ファイルの拡張子は .gresource.xml、
リソースファイルの拡張子は .gresource です。

ヘルプのオプション:
  -h, --help                     ヘルプのオプションを表示する

アプリケーションのオプション:
  --version                      プログラムのバージョンを表示して終了する
  --target=ファイル              出力ファイル名
  --sourcedir=DIRECTORY          対象のファイル (FILE) を読み込むディレクトリ (デフォルト: 現在のディレクトリ)
  --generate                     ターゲットファイル名拡張子で選択された形式で出力生成
  --generate-header              ソースヘッダーを生成する
  --generate-source              リソースファイルをコードにリンクするためのソースコードを生成する
  --generate-dependencies        依存関係リストを生成する
  --dependency-file=ファイル     生成する依存関係ファイルの名前
  --generate-phony-targets       生成される依存関係ファイルに PHONY ターゲットを含める
  --manual-register              リソースを自動的に作成および登録しない
  --internal                     関数をエクスポートしない (G_GNUC_INTERNAL を使用してください)
  --external-data                リソースデータを C ファイルに埋め込まない (代わりに外部からリンクされると仮定する)
  --c-name=IDENTIFIER            生成されるソースコードで使用される C 識別子名
  -C, --compiler=コマンド        ターゲット C コンパイラ (既定: CC 環境変数)

$
Usually, the resources are converted to a C source file. Two
options --target and --generate-source
are added to the command line. Move your current directory to
/src/tfe and run the command below, then a C source file
resources.c will be generated.
$ glib-compile-resources tfe3.gresource.xml --target=resources.c --generate-sourceModify tfe3.c and save it as
tfe3_r.c.
#include "resources.c"
... ... ...
... ... ...
build = gtk_builder_new_from_resource ("/com/github/ToshioCP/tfe3/tfe3.ui");
... ... ...
... ... ...
The function gtk_builder_new_from_resource
builds widgets from a resource.
Then, compile and run it.
$ bash comp tfe3_r
$ ./a.out
A window appears and it is the same as the screen shown by
tfe3.c.
Generally, using GResources is the best approach for C
programs. They allow you to use embedded assets in various
widgets. For example, a GtkImage can be created from a resource
path, provided that the original image file has been compiled
into the bundle using glib-compile-resources.
GtkWidget *image;
image = gtk_image_new_from_resource (const char* resource_path)