How to Build the Gtk4 Tutorial
Quick Start Guide
- You will need a Linux operating system, Ruby, Rake, Pandoc, and a LaTeX system.
- Download this repository and extract its contents.
- Change your current directory to the root directory of the source files.
- Run
rake htmlto create HTML files. These files will be generated in thedocsdirectory. - Run
rake pdfto create a PDF file. The file is generated in thelatexdirectory.
Prerequisites
- Linux operating system: The programs in this repository have been tested on Ubuntu 21.04.
- Files in this repository: There are two ways to obtain the files:
- Using Git: Run
git clone https://github.com/ToshioCP/Gtk4-tutorial.gitin your terminal. - Download Zip: Click the green
Codebutton on the repository’s main page and select “Download ZIP”.
- Using Git: Run
- Ruby and Rake.
- Pandoc: Used to convert Markdown to HTML and/or LaTeX.
- Latex system: Tex Live 2020 or later is recommended for generating the PDF file.
Markdown Variants and .src.md Files
GitHub Flavored Markdown (GFM)
When you visit the Gtk4_tutorial GitHub
repository, the README.md file is displayed on the main
page. This file is written in Markdown, which typically uses the .md
extension.
There are several dialects of Markdown. The README.md
file uses “GitHub Flavored Markdown” or simply, GFM. The files in the
gfm directory are also written in GFM. For more details,
please refer to the GitHub
Flavor Markdown spec.
Pandoc’s Markdown
This tutorial also utilizes another dialect known as “Pandoc’s Markdown.” Pandoc is a powerful tool for converting between formats such as Markdown, HTML, LaTeX, and Word (.docx). In this project, this specific dialect is used when converting the source files into HTML or LaTeX.
The .src.md File and @@@ Commands
The .src.md File
Source files in this project use the .src.md extension. The syntax of
a .src.md file is similar to standard Markdown, but it includes a
special custom command: the @@@ command. Each command block starts with
a line beginning with @@@, followed by a command name and ends with a
line containing only @@@.
For example,
@@@include
tfeapplication.c
@@@
The first line is called a directive, which consists of “@@@” and “include” (the command name).
There are four types of @@@ commands, as described below.
@@@include
This command starts with the directive @@@include.
@@@include
tfeapplication.c
@@@
It is replaced by the content of the source file specified between
the @@@include and @@@ markers. The example
above includes a C source file tfeapplication.c.
If specific function names follow the filename, only those functions will be extracted.
@@@include
tfeapplication.c main startup
@@@
The above command would be replaced specifically by the
main and startup functions found in
tfeapplication.c.
You can also include source files from other languages. The following
example shows that the ruby file lib_src2md.rb is inserted
by the command.
@@@include
lib_src2md.rb
@@@
Note that function-specific extraction is only supported for C source files.
The inserted text is automatically converted into a fenced code
block. Fenced code blocks start and end with ~~~, and the
contents are displayed verbatim. Three consecutive tildes are called a
“code fence” because they look like a fence.
When the target format is GFM, an “info string” (language identifier)
is added after the opening fence. The following example shows that the
@@@ command includes a C source file sample.c.
$ cat src/sample.c
int
main (int argc, char **argv) {
  ... ...
}
$cat src/sample.src.md
  ... ...
@@@include -N
sample.c
@@@
  ... ...
$ ruby src2md.rb src/sample.src.md
$ cat gfm/sample.md
  ... ...
~~~C
int
main (int argc, char **argv) {
  ... ...
}
~~~
  ... ...
Info strings are usually languages like C, ruby, xml and so on. This identifier is determined by the file extension:
.c=> C.rb=> ruby.xml=> xml
The list of supported languages is defined in the lang
method within lib/lib_src2md.rb.
By default, line numbers are inserted at the beginning of each line.
To disable this, use the -N option with the @@@include
command.
Options:
-n: Inserts a line number at the top of each line (default).-N: No line number is inserted.
The following shows that the line numbers are inserted at the beginning of each line.
$cat src/sample.src.md
  ... ...
@@@include
sample.c
@@@
  ... ...
$ ruby src2md.rb src/sample.src.md
$ cat gfm/sample.md
  ... ...
~~~C
 1 int
 2 main (int argc, char **argv) {
  ... ...
14 }
~~~
  ... ...
If the Markdown file is an intermediate step for HTML output, a
different info string is used. If the @@@include command
doesn’t have -N option, then the generated markdown is:
~~~{.C .numberLines}
int
main (int argc, char **argv) {
  ... ...
}
~~~
The info string .C specifies C language. The
.numberLines class is a feature of Pandoc’s Markdown; it
allows Pandoc to generate CSS that inserts line numbers into the final
HTML. As a result, the fenced code block in the Markdown source does not
contain hard-coded line numbers, unlike GFM. If -N option
is given, then the info string is {.C} only.
If the Markdown file is an intermediate step for LaTeX file, the same info string follows the beginning fence.
~~~{.C .numberLines}
int
main (int argc, char **argv) {
  ... ...
}
~~~
Rake uses Pandoc with the –listings option to convert Markdown into a LaTeX file. The resulting LaTeX file utilizes the listings package to display source code rather than a simple verbatim environment. The Markdown file is converted to the following LaTeX source file.
\begin{lstlisting}[language=C, numbers=left]
int
main (int argc, char **argv) {
  ... ...
}
\end{lstlisting}
The listings package can color or emphasize keywords, strings, comments and directives. But it doesn’t really analyze the syntax of the language, so the emphasis tokens are limited.
The @@@include command has two advantages:
- Less typing.
- Modifying a C source file does not require manual updates to the .src.md file, making maintenance much easier for authors.
@@@shell
This command begins with the @@@shell directive.
@@@shell
shell command
 ... ...
@@@
It is replaced by both the executed command itself and its standard output.
For example,
@@@shell
wc Rakefile
@@@
This is converted to:
~~~
$ wc Rakefile
164  475 4971 Rakefile
~~~@@@if series (Conditional Branching)
This command block starts with @@@if and can be followed
by @@@elif, @@@else, or @@@end.
These work similarly to the #if, #elif,
#else, and #endif preprocessor directives in
C. For example,
@@@if gfm
Refer to  [tfetextview API reference](tfetextview_doc.md)
@@@elif html
Refer to  [tfetextview API reference](tfetextview_doc.html)
@@@elif latex
Refer to tfetextview API reference in appendix.
@@@end
The directives @@@if and @@@elif accept
conditions such as gfm, html, or
latex.
- gfm: If the target is GFM.
- html: If the target is HTML.
- latex: If the target is PDF.
Other type of conditions may be available in the future version.
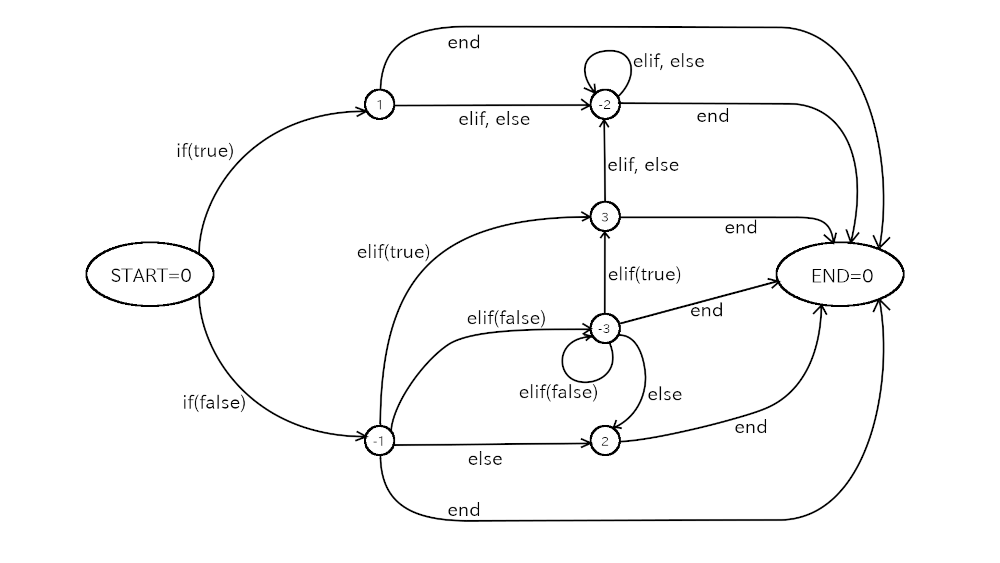
The code analyzing @@@if series commands is rather complicated. It is based on the state diagram below.
@@@table
This type of @@@ command starts with a line that begins with
@@@table. This command takes a GFM or Pandoc-style table as
input and formats it to be more human-readable in the source file. For
example, a text file sample.md has a table like this:
Price list

@@@table
|item|price|
|:---:|:---:|
|mouse|$10|
|PC|$500|
@@@
The command changes this into:
Price list

|item |price|
|:---:|:---:|
|mouse| $10 |
| PC  |$500 |
This command only affects the visual alignment of the table in Markdown; it does not change the final HTML or LaTeX output. Notice that the command supports only the above type of Markdown table format.
A script mktbl.rb supports this command. If you run the
script like this:
$ ruby mktbl.rb sample.mdThen, the tables in ‘sample.md’ will be arranged. The script also
makes a backup file sample.md.bak.
The task of the script seems easy, but the program is not so simple.
The script mktbl.rb uses the library
lib/lib_src2md.rb
The @@@ commands are effective throughout the whole text. This means
you can’t stop the @@@ commands. But sometimes you want to show the
commands literally. One solution is to add four blanks at the top of the
lines. Then @@@ commands are not effective because @@@ must
be at the top of the line.
Conversion
The @@@ commands are processed by the src2md method in
lib/lib_src2md.rb. This method converts .src.md files into
standard Markdown files. In addition, the src2md method
performs the following transformations:
- Relative links: These are updated to reflect the change in the base directory.
- Image sizes: Image size options (e.g., {width=…}) are removed when the target format is GFM or HTML.
- HTML-specific links: For HTML output, all relative
links are removed, except for those pointing to other
.src.mdfiles. - LaTeX-specific links: For LaTeX output, all relative links are removed.
The conversions are executed in the following order:
- @@@if
- @@@table
- @@@include
- @@@shell
- others
The src2md.rb script in the root directory simply
invokes the src2md method. Similarly, the
Rakefile also calls this method as part of its tasks.
Directory Structure
The Gtk4-tutorial directory contains seven
subdirectories: gfm, docs, latex,
src, image, test and
lib. The gfm, docs, and
latex directories serve as the destination folders for GFM,
HTML, and LaTeX files, respectively. Note that these three destination
directories may not exist at the beginning of the conversion. The
conversion program automatically makes the directories if they do not
exist.
src: Contains the .src.md source files and C source code.image: Contains image files, such as PNG or JPG.gfm: Contains GFM files converted by Rake from the .src.md source files.docs: Contains HTML files converted by Rake (rake html) from the .src.md source files.latex: Contains a PDF file and intermediate LaTeX files converted by Rake (rake pdf) from the .src.md source files.lib: Contains ruby library files.test: Contains test files, which are executed by runningrake testin the terminal.
Organization of the Source Files
The src and Root
Directory
The src directory contains .src.md files and C-related
source files. The root directory (Gtk4-tutorial) contains
the Rakefile, src2md.rb, and other essential
files. The generated README.md is placed in this root
directory. It includes the title, an overview, and a table of contents
with links to the GFM files.
Rakefile describes how to convert .src.md files into
GFM, HTML and/or PDF files. Rake converts the source files according to
the Rakefile.
File Naming in the
src Directory
The src directory contains abstract.src.md,
individual section files, and other .src.md documents. Rake converts
abstract.src.md to the overview of this tutorial such as
gfm/README.md, docs/index.html and/or
corresponding part of the PDF file. Section files are named using the
prefix “sec” followed by the section number and the .src.md extension
(e.g., sec1.src.md, sec5.src.md, or
sec12.src.md). They are the files that correspond to the
section 1, section 5 and section 12 respectively.
C Source Code Storage
Most .src.md files use the @@@include command to pull in
C source code. These C files are organized into subdirectories under the
src directory.
All included C files have been tested. When you compile the source
files, some auxiliary files and a target file like a.out
are created. When you use meson and ninja for
compilation, they create a temporary _build directory.
Those files and directories are ignored by Git as specified in the
.gitignore file.
Renumbering
Occasionally, you may need to insert a new section, for example, between Section 4 and Section 5. You can temporarily name it “Section 4.5” to place it between the two. However, since section numbers should be integers, Section 4.5 must be renamed to Section 5, and all subsequent section numbers must be incremented by one.
This renumbering process is handled automatically by the
renumber method in lib/lib_renumber.rb. This
method performs two main tasks:
- Renaming the physical files.
- Updating any internal links or references within the .src.md files to match the new section numbers.
Rakefile
The Rakefile is similar to a Makefile but is executed by
Rake, a Ruby-based build tool. The Rakefile in this project
defines the following tasks:
md: Generates GFM Markdown files (default task).html: Generates HTML files.pdf: Generates LaTeX source files and compiles them into a PDF using lualatex.all: Generates GFM, HTML and PDF files.clean: Deletes LaTeX intermediate files.clobber: Deletes all the generated files.
Rake automatically performs the renumbering process before executing any of these tasks.
Generating GFM Files
You can generate GFM files by simply running Rake in your terminal:
$ rakeThis command generates README.md from
src/abstract.src.md and titles of each .src.md file. At the
same time, it converts each .src.md file into a GFM file and store it
under the gfm directory. Navigation links (e.g., “Next” and
“Previous”) are automatically inserted to the top and bottom of each
generated Markdown file.
You can specify the width and height of images within .src.md files using the following syntax:
{width=10cm height=6cm}Since image size attributes (e.g., {width=10cm}) are specific to LaTeX and are not supported by GFM syntax, they are automatically stripped out during the conversion to GFM or HTML.
If a .src.md file has relative URL links, they will be changed by
conversion, since GFM files are located under the gfm
directory while .src.md files lie in the src directory.
That means the base directory of the relative links is different. For
example, [src/sample.c](sample.c) is translated to
[src/sample.c](../src/sample.c).
Similarly, if a link points another .src.md file, the target
extension is automatically updated to .md. For example,
[Section 5](sec5.src.md) is translated to
[Section 5](sec5.md).
The following command cleans all the generated files.
$ rake clobberSometimes this is necessary before generating GFM files.
$ rake clobber
$ rake
If you add a new section, running rake clobber is necessary to ensure
that the “Next” and “Previous” navigation links are correctly updated.
Without rake clobber, these links may not be updated
because Rake’s dependency tracking will see that the existing .md files
in the gfm directory are already newer than their
corresponding .src.md sources. Alternatively, using the touch command on
the previous section’s .src.md file will also force an update of its
navigation links.
If you view the GitHub repository (ToshioCP/Gtk4-tutorial),
README.md is shown below the code. And
README.md includes links to each Markdown file. This allows
the GitHub repository to function not just as a source code host, but as
a readable online version of the entire tutorial.
Generating HTML Files
The .src.md files can also be converted into HTML. This process requires Pandoc. Most Linux distributions include a Pandoc package; please refer to your distribution’s documentation for installation instructions.
Type rake html to generate HTML files.
$ rake htmlRake first generates intermediate Pandoc-style Markdown files in the
docs directory. Then, it executes pandoc to
convert them into final HTML files. The width and height of image files
are removed. Links to .src.md files will be converted like this.
[Section 5](sec5.src.md) => [Section 5](sec5.html)Image files are copied to the docs/image directory, and
their links are updated accordingly:
[sample.png](../image/sample.png) => [sample.png](image/sample.png)Other relative links will be removed.
The top HTML file index.html corresponds to the
README.md file in the gfm directory. If you
want to clean HTML files, type rake clobber or
cleanhtml.
$ rake clobberEach HTML file includes a standard header
(<head> ... </head>), generated by Pandoc using
the standalone (-s) option. You can customize the output with your own
template file for pandoc. Rake uses
lib/lib_mk_html_template.rb to create its own template.
This template integrates Bootstrap CSS and JavaScript via the jsDelivr
CDN.
The docs directory contains all the necessary html
files. They are used in the GitHub pages of this
repository.
To publish this tutorial on your own website, simply upload the
contents of the docs directory to your web server.
Generating a PDF File
Converting Markdown files into LaTeX source files also requires Pandoc.
Type rake pdf to generate laTeX files and finally create
a PDF file.
$ rake pdfFirst, it generates Pandoc’s Markdown files under latex
directory. Then, Pandoc converts them into LaTeX files. Links to local
files or directories are removed during conversion because LaTeX does
not support them in the same way. However, external URLs and image
references are preserved. Image dimensions are determined by the values
specified within the curly braces in the source file.
{width=10cm height=6cm}You should specify appropriate dimensions; a good rule of thumb is roughly 0.015 x (width in pixels) cm. For example, if the width of an image is 400 pixels, the width in a LaTeX file will be almost 6cm.
The file main.tex serves as the root LaTeX file. It
contains \input commands between the
\begin{document} and \end{document} tags to
include each individual section. It also has \input, which
inserts helper.tex in the preamble. Both
main.tex and helper.tex are generated by the
lib/lib_gen_main_tex.rb script. The script converts a
sample piece of Markdown using pandoc -s, extracts the
resulting LaTeX preamble, and saves it into helper.tex. You
can customize helper.tex by modifying
lib/lib_gen_main_tex.rb.
Finally, LuaLaTeX compiles the main.tex into a PDF
file.
If you want to clean the latex directory, type
rake clobber or rake cleanlatex
$ rake clobberThis removes all the LaTeX source files and a PDF file.